Menu
| File | > | Profiles | > | Financial Profiles | > | Outgoings |
Mandatory Prerequisites
Prior to creating an Outgoings Profile, refer to the following Topics:
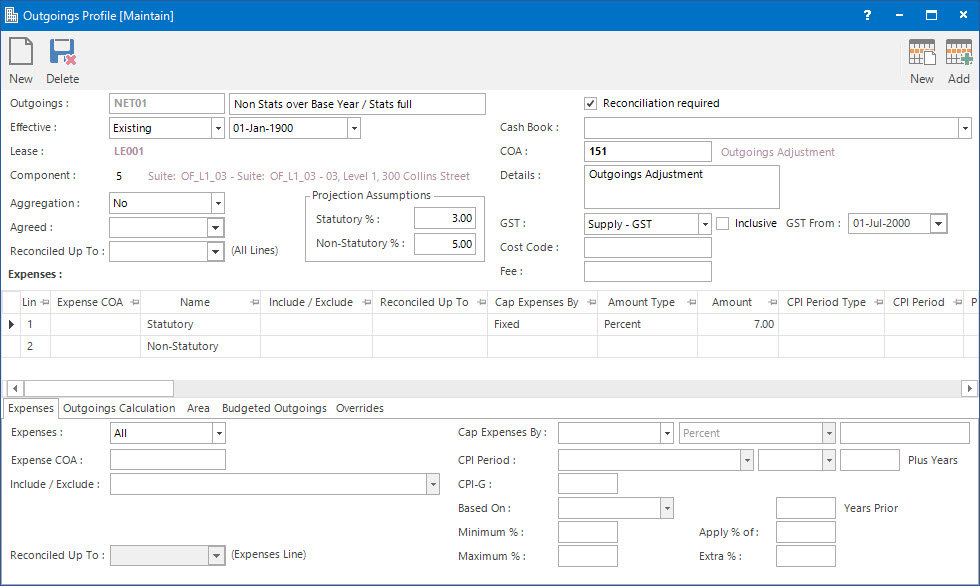
Screenshot and Field Descriptions
Outgoings: this is the primary identifier for the Outgoings Profile.
Name: this is the friendly name given to the Outgoings Profile.
Effective: this is the starting date the Profile is effective from. The options are:
- New: this option refers to the starting date of a new Profile that is effective from.
- Existing: this option refers to the starting date of the current Profile that is effective from.
The Effective field is only available when the Profile is accessed from the Lease Component, refer to Adjusting the Outgoings Profile for a Lease Component in order to do so.
A Lease can have different Outgoings rules over its lifetime. By using the Effective field, multiple Profiles can be entered for the Lease.
Lease: this is the Lease record the Profile is attached to. This field is only available when the Profile is accessed from the Lease Component, refer to Adjusting the Outgoings Profile for a Lease Component in order to do so.
Component: this is the Lease Component the Profile is attached to. This field is only available when the Profile is accessed from the Lease Component, refer to Adjusting the Outgoings Profile for a Lease Component in order to do so.
Aggregation: this is the option to select whether the negative expense movements are to be included in the total outgoings calculation. The options are:
- Yes: expense amounts that end up as negative will offset positive amounts. An example of where an expense amount can be negative is, if the current amount is less than the Base Year amount.
- No: expense amounts that end up as negative are not included in the total expenses.
Agreed: this is the date when the Outgoings settings were agreed on. This field is only available when the Profile is accessed from the Lease Component, refer to Adjusting the Outgoings Profile for a Lease Component in order to do so.
Reconciled Up To (All Lines): this is the date the Outgoings have been reconciled up to. This field is only available when the Profile is accessed from the Lease Component, refer to Adjusting the Outgoings Profile for a Lease Component in order to do so.
The Reconciled Up To (All Lines) field will be automatically updated when the Outgoings Reconciliation process is run. By default, this is set on all lines in the Expenses Tab. Each individual Expenses Line can have its own Reconciled Up To date if required.
Projection Assumptions: this is the assumption percent value for how much expenses are going to increase / decrease in the future and are used when running the Outgoings Projections function. The options are:
- Statutory %: this is the percent to apply for Chart of Accounts set as the Statutory Outgoings type.
- Non-Statutory %: this is the percent to apply for Chart of Accounts set as the Non-Statutory Outgoings type.
Reconciliation Required: this check box determines whether an outgoings reconciliation needs to be done for the Lease at the end of the outgoings year.
The Reconciliation Required check box should not be ticked if the Lease has outgoings incorporated into the Rent charge (Gross type lease), or if the Outgoings are on-charged to the tenant as they come in (Net type lease).
When the Reconciliation Required check box is ticked, then values for raising the recovery / refund transaction are required as follows:
Cash Book: this is the Bank account if the transactions raised are going to be a Cash Sales / Cash Credit type transaction. Leave blank if a Invoice / Credit Note type transaction is to be raised.
Details: this is the description for the transactions. It will default to the value set up for the COA.
GST: this is the GST Type for the transactions. It will default to the type set up for the COA.
Inclusive: this check box determines if the Amount includes GST. If this field is ticked, when the GST is calculated, the Amount will be reduced by the GST and the tick will disappear to reflect that the line no longer includes GST. If this check box is not ticked, the Amount will not be reduced and the GST will be calculated normally.
GST From: this is a historical field and current use is now irrelevant. It was used during the implementation of GST to allow contractual date based transactions to escape full GST. There may be old transactions on the system to which the rule applied.
Cost Code: this is the cost centre that the amounts relate to. This field can be set as optional, mandatory or not required on the COA set up screen.
Expenses table: this table displays the list of expenses and the rules applied to them.
Screenshot and Field Descriptions: Expenses Tab

- All: this is the option to apply all Chart of Accounts.
- Statutory: this is the option to apply the Chart of Accounts that are specified as statutory expenses.
- Non-Statutory: this is the option to apply the Chart of Accounts that are specified as non-statutory expenses.
- Select: this is the option to apply an individual Chart of Account. When this check box is ticked, the following options become available:
Include / Exclude: this is the option to include / exclude the Chart of Account into the Outgoings calculations and the set up related to it. The options are:
- Leave Blank.
- Include with Other Conditions: this option refers to the Chart of Account being included in calculations but different rules can be set up for it.
- Include Other COA Outgoing Type: if a Statutory Chart of Account is selected, then this option refers to including it in the Non-Statutory calculations instead and vice versa.
- Exclude from Capping: this option refers to the Chart of Account to be included in the Outgoings calculation but any Capping rules will not apply.
- Exclude from Calculation: this option refers to the Chart of Account to be excluded from the Outgoings calculation.
Reconciled Up To (Expenses Line): this is the date the Outgoings have been reconciled up to for the Expenses line on the Profile. This field is only available when the Profile is accessed from the Lease Component, refer to Adjusting the Outgoings Profile for a Lease Component in order to do so.
Cap Expenses By: this option is used if outgoings expense amounts need to be capped for the calculations.
Fixed
- Percent: expenses will be capped at last year’s amount plus a percent.
- Increase / Decrease: expenses will be capped at last year’s amount plus / minus a set amount.
- Amount: expenses will be capped at the entered amount.

CPI
- CPI Period: this field lets you select the CPI period that will be used to calculate the amount.
- Start of Outgoings Year: percent will be worked out from last specified CPI period before the start of the outgoings year.
- End of Outgoings Year: percent will be worked out from last specified CPI period before the end of the outgoings year.
- End of Outgoings Year Plus: percent will be worked out based on the last specified CPI period before the end of the outgoings year including the number of years entered in the Plus years field, which becomes available when this option is selected.
- Based On: this determines if the calculation is based on the released CPI Index or the rounded to one decimal place CPI Percent figure.
- Minimum %: this option allows you to specify a minimum percentage to apply to the calculation.
- Maximum %: this option allows you to specify a maximum percentage to apply to the calculation.
- Apply % of: this field is used to specify the percentage amount of the CPI index to apply to the calculation.
- Extra %: this field is used to specify an extra percentage amount to be added in addition to the calculated CPI percent.
Screenshot and Field Descriptions: Outgoings Calculations Tab

If no Capping is set on the Expenses Tab, then the values on the left-hand side of the Outgoings Calculations Tab can be left as the default values. If Capping is set on the Expenses Tab, then the fields should be used to specify the capping method. The available values are based around if the capping is based on the Property expenses for the previous year or the Lease Component (Tenant) proportion for the previous year.
If Capping values have been set on the Expenses tab, select the appropriate calculation method on the Calculation Method, Increase Level, Amount to Cap On and Apply Capping fields. The option selected in the Calculation Method determines what values are available in the other fields.
Calculation Method (Lease Component Proportion Level): this calculation method caps the outgoings amount for the Tenant based on the amounts for the Tenant in the previous year.
If Lease Component Proportion Level option is selected in the Calculation Method field, the following options will be available:
Increase Level: Only the Lease Component Proportion will be available for this field.
Amount To Cap On: The options are:
- Last Paid: cap on what the Tenant paid last year.
- Last Actuals: cap on what the actual Tenant proportion was last year.
- Cumulative: cap on a past amount i.e. base year amount, plus a cumulative percent.
- Last Paid (less Base): cap on what the Tenant paid last year less the Base Year amount.
Apply Capping: The options are:
- COA Level: apply capping to each individual COA.
- COA Outgoings Type Level: apply capping to total of all Statutory / Non Statutory COAs.
- All: apply capping to the total of all COAs.
Calculation Method (Parent Property Level): this calculation method caps the outgoings amount for the Tenant based on the amounts for the Parent Property in the previous year.
If the Parent Property Level option is selected in the Calculation Method field, the following options will be available:
Increase Level: The options are:
- Lease Component Proportion: calculate based on Tenant Proportion amounts.
- Parent Property: calculate based on Parent Property amounts.
Amount To Cap On: The options are:
- Lease Component Last Paid: cap on what the Tenant paid last year.
- Parent Property Last Paid: cap on what the capped Parent Property expenses were last year.
Apply Capping: The options are:
- COA Level: apply capping to each individual COA.
- COA Outgoings Type Level: apply capping to total of all Statutory / Non Statutory COAs.
- All: apply capping to the total of all COAs.
Cumulative CPI From: these fields will become available if CPI is selected in the Cap Expenses By and Cumulative is selected in Amount to Cap On fields respectively. By default, the percentage will be the difference between the CPI figures for the last year. If it needs to be based on the difference in CPI for many years, the user can then select which CPI Period to start from to calculate the cumulative percentage.
Base Year: if Outgoings is based on a percentage of increase of Expenses over a Base Year then select the Year. (Note, the Expense amounts for the Base Year will need to be entered in the Outgoings Expenses screen).
Type: this selection determines if the Base Year is from Actual expense amounts or Budget expense amounts. The options are:
- Actual: this is the Actual expense amount.
- Budget: this is the Budget expense amount.
Align to Period: select the Accounting period the outgoings year is aligned to.
or As At: this option is used if the user wants to work out the Base Year / Align to Period based on a date. When the date is entered, the Base Year / Align to fields will show the Year / Period for the date.
First Year: this is the first year to start capping from, if the year is different from the Base Year.
Screenshot and Field Descriptions: Area Tab

Percent: this is the option to select on which basis the tenant contribution should be calculated on. The options are:
- of Parent Area: select this option if the calculation should be based on Area.
- Override: select this option if the calculation should be based on a percent other than Area and enter the required override percentage.
If the of Parent Area option is selected, the following fields will be available for input:
Component Area Type: this is the area type for the Component Property under the selected Parent Property level. This field is only available when the Profile is accessed from the Lease Component, refer to Adjusting the Outgoings Profile for a Lease Component in order to do so.
Screenshot and Field Descriptions: Budgeted Outgoings Tab

Budgeted Up To: this is the date the Budgeted Outgoings process has been run up to for this Lease. It will be automatically updated when the Budgeted Outgoings process is run. This field is only available when the Profile is accessed from the Lease Component , refer to Adjusting the Outgoings Profile for a Lease Component in order to do so.
Screenshot and Field Descriptions: Overrides Tab
The Overrides tab is useful if user is taking on the system and previous years capping amounts back to base year are not available.

Year: this is the year to start from.
Lease Component Last Paid: this amount will be used if on the Expenses Tab:
- The Calculation Method is Lease Component Proportion Level and Amount To Cap On is Last Paid.
- The Calculation Method is Parent Property Level and Amount To Cap On is Lease Component Last Paid.
Lease Component Last Actuals: this amount will be used if the Calculation Method is Lease Component Proportion Level and Amount To Cap On is Last Actuals.
Lease Component First Year Actuals: this amount will be used if the Calculation Method is Lease Component Proportion Level and Amount To Cap On is Cumulative and Base Year has a value.
Lease Component Last Highest Paid: this amount will be used if the Calculation Method is Lease Component Proportion Level and Amount To Cap On is Cumulative and Base Year does not have a value.
Parent Property Last Paid: this amount will be used if the Calculation Method is Parent Property Level and Amount To Cap On is Last Paid.
Parent Property Last Actuals: this amount is for reference only and is not used for previous year capping amounts.
Parent Property First Year Actuals: this amount is for reference only and is not used for previous year capping amounts.
How Do I : Add a new Outgoings Profile
How Do I : Modify an existing Outgoings Profile
Modifying an existing Outgoings Profile will not change the Lease Outgoings instances that have already been created against the Lease components. The changes will only affect new Lease Outgoings entries you create subsequent to the Lease Outgoings Profile changes. If you need to change existing entries, these will need to be done individually.
How Do I : Delete an Outgoings Profile
Deleting an existing Outgoings Profile will only remove the record associated with the Effective Date, when attached to a Lease Component.
Deleting an existing Outgoings Profile will not delete the Lease Outgoings instances that have already been created against the Lease components. If you need to delete existing entries, these will need to be done individually.
Outgoings Profiles are associated with the following Topics: